Sending Messenger Messages
Sending Text Messages

Text message is the most frequent and common message types among all chat channels. It also offers a minimal format while carrying out dynamic data, e.g., stock price and weather info.
async function SendHi(context) {
  await context.sendText('Hi!');
}
Sending Rich Media Messages

Rich media consist of images, videos, audios, and files.
Rich media is useful when your priority is to catch the user's attention, e.g., limited promotion. Plus, it is also handy to create an immersive experience, e.g., telling a story.
In the following section, you can see four different approaches while sending Rich Media Messages.
If you want to benefit from Facebook's cache, i.e., much faster loader time, then you should jump to section Attaching Saved Assets.
Approach 1: Send by URL
Sending by URL might be the easiest way in terms of implementation. We recommend you to use this approach only for prototyping; the loading speed is probably driving your clients or customers crazy.
await context.sendImage('https://example.com/image.jpg');
await context.sendVideo('https://example.com/video.mp4');
await context.sendAudio('https://example.com/audio.mp3');
await context.sendFile('https://example.com/receipt.pdf');
Approach 2: Attaching Saved Assets
If you want to benefit from Facebook's cache, i.e., a much pleasant loading speed, you should try this a bit complicated approach.
First, you need to get a page-scoped Attachment Id by Attachment Upload API.
Once you get your Attachment Id, you can send rich media messages with the following code.
await context.sendImage({ attachmentId: '<ATTACHMENT_ID>' });
await context.sendVideo({ attachmentId: '<ATTACHMENT_ID>' });
await context.sendAudio({ attachmentId: '<ATTACHMENT_ID>' });
await context.sendFile({ attachmentId: '<ATTACHMENT_ID>' });
Note: >
Attachment Idis page-scoped.
A commercial bot project usually involves a staging Page for development and a production Page for production. In this case, before bot release, you have to re-upload all the attachments and update all the
Attachment Id.
Approach 3: Attaching ReadStreams
In the following example, you can send rich media by creating a readable stream. The file path is relative to your bot location.
const fs = require('fs');

await context.sendImage(fs.createReadStream('image.jpg'));
await context.sendVideo(fs.createReadStream('video.mp4'));
await context.sendAudio(fs.createReadStream('audio.mp3'));
await context.sendFile(fs.createReadStream('receipt.pdf'));
Approach 4: Attaching Buffers
In the following example, you can send rich media by creating a buffer. The file path is relative to your bot location.
await context.sendImage(imageBuffer, { filename: 'image.jpg' });
await context.sendVideo(videoBuffer, { filename: 'video.mp4' });
await context.sendAudio(audioBuffer, { filename: 'audio.mp3' });
await context.sendFile(fileBuffer, { filename: 'receipt.pdf' });
Sending Template Messages


In short, Template message is an interactive gallery composed of image, video, title, subtitle, and buttons.
Template message is the key to offer rich media interaction. It usually used in the scenario of display multiple choices and next actions to the user, e.g., applying coupon, booking a room, making a reservation.
Note: If you are familiar with LINE and Messenger, you can find the difference Chat UI approach. While LINE creates an HTML-like, super flexible chat UI,
Flex Messages, Messenger tends to focus on common chat UI patterns to offer a consistent user experience.
Generic Template

In a Generic Template, you can create up to 10 items in a row. Each item is composed of a title, subtitle, image, and up to 3 buttons.
Note: Please refer to Messenger's official guide of
Generic Templateto find out the latest specification.
await context.sendGenericTemplate([
  {
    title: "Welcome to Peter's Hats",
    imageUrl: 'https://petersfancybrownhats.com/company_image.png',
    subtitle: "We've got the right hat for everyone.",
    defaultAction: {
      type: 'web_url',
      url: 'https://peterssendreceiveapp.ngrok.io/view?item=103',
      messengerExtensions: true,
      webviewHeightRatio: 'tall',
      fallbackUrl: 'https://peterssendreceiveapp.ngrok.io/',
    },
    buttons: [
      {
        type: 'postback',
        title: 'Start Chatting',
        payload: 'DEVELOPER_DEFINED_PAYLOAD',
      },
    ],
  },
]);
Button Template

Button Template is similar to Generic Template; the only difference is the removal of the item image.
Note: Please refer to Messenger's official guide of
Button Templateto find out the latest specification.
await context.sendButtonTemplate('What do you want to do next?', [
  {
    type: 'web_url',
    url: 'https://petersapparel.parseapp.com',
    title: 'Show Website',
  },
  {
    type: 'postback',
    title: 'Start Chatting',
    payload: 'USER_DEFINED_PAYLOAD',
  },
]);
Receipt Template

Receipt Template is a template designed for order confirmation.
Note: Please refer to Messenger's official guide of
Receipt Templateto find out the latest specification.
await context.sendReceiptTemplate({
  recipientName: 'Stephane Crozatier',
  orderNumber: '12345678902',
  currency: 'USD',
  paymentMethod: 'Visa 2345',
  orderUrl: 'http://petersapparel.parseapp.com/order?order_id=123456',
  timestamp: '1428444852',
  elements: [
    {
      title: 'Classic White T-Shirt',
      subtitle: '100% Soft and Luxurious Cotton',
      quantity: 2,
      price: 50,
      currency: 'USD',
      imageUrl: 'http://petersapparel.parseapp.com/img/whiteshirt.png',
    },
    {
      title: 'Classic Gray T-Shirt',
      subtitle: '100% Soft and Luxurious Cotton',
      quantity: 1,
      price: 25,
      currency: 'USD',
      imageUrl: 'http://petersapparel.parseapp.com/img/grayshirt.png',
    },
  ],
  address: {
    street1: '1 Hacker Way',
    street2: '',
    city: 'Menlo Park',
    postalCode: '94025',
    state: 'CA',
    country: 'US',
  },
  summary: {
    subtotal: 75.0,
    shippingCost: 4.95,
    totalTax: 6.19,
    totalCost: 56.14,
  },
  adjustments: [
    {
      name: 'New Customer Discount',
      amount: 20,
    },
    {
      name: '$10 Off Coupon',
      amount: 10,
    },
  ],
});
Media Template


You can find the simplicity and elegance of Media Template. Try it if you agree with "A picture is worth a thousand words." The difference between it and Generic Template is the removal of title and subtitle.
Note: Please refer to Messenger's official guide of
Media Templateto find out the latest specification.
await context.sendMediaTemplate([
  {
    mediaType: 'image',
    attachmentId: '1854626884821032',
    buttons: [
      {
        type: 'web_url',
        url: 'https://en.wikipedia.org/wiki/Rickrolling',
        title: 'View Website',
      },
    ],
  },
]);
Sending with Quick Reply

We would recommend you to treat Quick Reply as an alternative to user text input.
A Quick Reply consists of up to 13 Quick Reply Buttons. When the user taps a Quick Reply Button, the Quick Reply dismissed. Then, the title of the tapped button is posted to the conversation as a message. Meanwhile, a messages event sends to your webhook that contains the button title and an optional payload.
In the following sections, you can see three different types of Quick Reply.
Note:
- When we met
Quick Replyfirst time, we were confused about the best practice of usingQuick ReplyorButton. Finally, we found outQuick Replyis the best solution to guide the user to keep interacting with the bot, while aURL Buttonbrings user outside bot. What's more, theQuick Replydisappears when one ofQuick Reply Buttonsis tapped, which keepsQuick Replyonly live under the present context, while aButtoncan be triggered even it is in the chat history.- Please refer to Messenger's official guide of
Quick Repliesto find out the latest specification.
Text Quick Reply

You can send up to 13 Text Quick Reply Buttons in a Quick Reply. Each Text Quick Reply can add one optional icon next to the button title.
await context.sendText('Hi!', {
  quickReplies: [
    {
      contentType: 'text',
      title: '<BUTTON_TEXT>',
      payload: '<DEVELOPER_DEFINED_PAYLOAD>',
    },
  ],
});
User Phone Number Quick Reply

The User Phone Number Quick Reply can be treated as an agree button to collect the user's phone number.
Messenger automatically pre-fill the displayed quick reply with the phone number from the user's profile information. Since many CRM (Customer Relationship Management) use the phone number as a unique id, it is handy for future user mapping.
Note: If the user's profile does not have a phone number, the quick reply doesn't show up. Also, the bot only receives the phone number until the user clicks the quick reply.
await context.sendText('Hi!', {
  quickReplies: [
    {
      contentType: 'user_phone_number',
    },
  ],
});
User Email Quick Reply
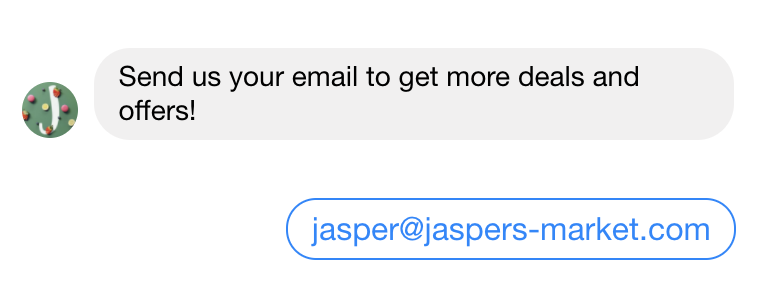
The User Email Quick Reply can be treated as an agree button to collect the user's Email.
Messenger automatically pre-fill the displayed quick reply with the Email from the user's profile information. Since many CRM (Customer Relationship Management) use the Email as a unique id, it is handy for future user mapping.
Note: If the user's profile does not have an Email, the quick reply doesn't show up. Also, the bot only receives the Email until the user clicks the quick reply.
await context.sendText('Hi!', {
  quickReplies: [
    {
      contentType: 'user_email',
    },
  ],
});
Sending with Persona
To give the customer a clear understanding of whether a human agent or a bot representing the Business Page, the Persona API allows a business to introduce a virtual persona into the thread. Please refer to our separate document about Persona.
await context.sendText('Hi!', {
  personaId: '<PERSONA_ID>',
});
Rate Limits
If you are making a bot with sudden high traffic, e.g., a campaign bot for Black Friday, you should deal with Rate Limits before you receive error code 613.
Page Rate limits are in place to prevent malicious behavior and poor user experiences. For Pages with large audiences, Messenger recommends a send rate of 250 requests per second.
Rate Limits is various from the size of your Page audience.
Calls within 24 hours = 200 * Total Messenger Audience
To prevent from hit Rate Limits, Messenger also advises us to architect our system to distribute any sudden high amounts of load over time.
Note: Refer to Messenger's official doc, Rate Limiting for the latest Messenger policy.