LINE Front-end Framework (LIFF)
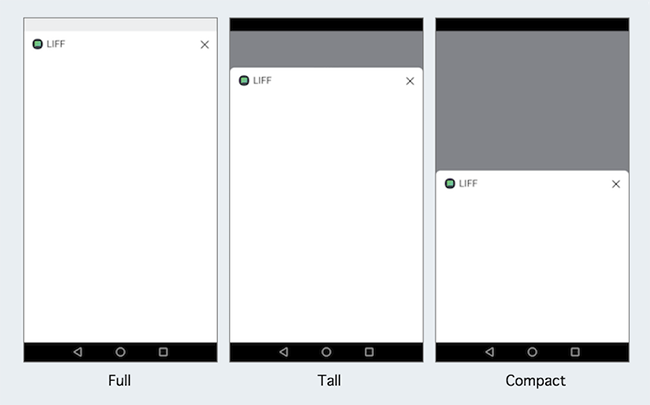
LINE Front-end Framework (LIFF) is the webview solution in LINE Apps. LIFF provides three different sizes of embedded webviews. You may use those sizes to enrich your users' experience:
Besides, LIFF gives you more chances to improve interactions between users and the chatbot. One of the common scenarios is submitting a form in LINE Bots.
Features in LIFF
LIFF lets you access a lot of different APIs on your web pages. Before getting started, you may want to grab some basic knowledge from LINE official docs:
- Getting user profile
- Sending messages to LINE
- Opening link in external browser
- Scanning QR Code
- Connecting to Bluetooth devices
- Others features in LIFF playground
LIFF V2
LIFF v2 introduces some new features to developers, e.g., scanning QR codes, allowing users to open LIFF pages on the Desktop version of the LINE app.
For catching up quickly, this is a minimal implementation - Bottender example with LIFF v2.
The following sections are step by step tutorials about how to send messages with LIFF in a Bottender project created by Create Bottender App.
Note: LIFF v1 is not recommended anymore. If you're using it, you should migrate to LIFF v2. However, you could still find an example for LIFF v1 here.
Workflow
For making your LIFF pages work, your typical workflow should look like this:
- Creating a LINE Login channel in LINE Developers console
- Adding a LIFF app in the LINE Login channel
- Developing the LIFF page
Creating LINE Login Channel
First of all, you need to open LINE Developers Console to create a LINE Login channel.
For more details about creating a LINE Login channel, please checkout Creating A Provider and Channel.
Adding LIFF in the LINE Login Channel
- Click the "LIFF" tab in the LINE Login Channel you just created.
- Click the "Add" button
- Fill in the "Endpoint URL" in this format:
https://{your domain}.ngrok.io/liff - Fill in other values
For more details about registering a LIFF app, please checkout Registering LIFF App.
Note: ngrok is a well-known service that provides public HTTPS URLs for your local server using the tunnel. When you develop your bot, you may want to use ngrok to get a temporary HTTPS URL.
Environment Variables Setting
If you are familiar with any official Bottender example, you may already know about how to use the .env file to manage your environment variables in your local project.
In this case, you need to add another LINE_LIFF_ID env to .env file, so there are at least those three LINE related environment variables in your file:
LINE_ACCESS_TOKEN={your LINE access token from LINE Messaging API channel}
LINE_CHANNEL_SECRET={your LINE channel secret from LINE Messaging API channel}
LINE_LIFF_ID={your LIFF id from LINE Login channel}
You could find your LIFF ID in the LIFF URL. The format of LIFF URL looks like line://app/{your LIFF ID}.
For more details about LIFF ID, please checkout Registering LIFF App (in step 4).
Adding Custom Routes to HTTP Server for LIFF Pages
To serve LIFF webpages, we need to add additional routes to the server. Fortunately, custom server come to the rescue!
You could use express, koa, restify, or whatever you like, but we are going to use express in this guide. Before going down, make sure that you set up correctly according to this guide.
After having a custom server, you could add the following two routes into server.js to handle requests from LIFF.
server.get('/send-id', (req, res) => {
  res.json({ id: process.env.LINE_LIFF_ID });
});

server.get('/liff', (req, res) => {
  const filename = path.join(`${__dirname}/liff.html`);
  res.sendFile(filename);
});
Initializing the LIFF Page
Before starting using any feature provided by LIFF, you need to create a liff.html file in the root directory of the project and copy the following code into it for LIFF initialization:
<!DOCTYPE html>
<html lang="en">
  <head>
    <meta http-equiv="Content-Type" content="text/html; charset=utf-8" />
    <meta name="viewport" content="width=device-width, initial-scale=1.0" />
    <title>BOTTENDER LINE LIFF V2 DEMO</title>
  </head>

  <body>
    <script src="https://static.line-scdn.net/liff/edge/2.1/sdk.js"></script>
    <script>
      function initializeLiff(myLiffId) {
        liff
          .init({
            liffId: myLiffId,
          })
          .then(() => {
            alert('LIFF init success!');
          })
          .catch((err) => {
            alert(`error: ${JSON.stringify(err)}`);
          });
      }

      document.addEventListener('DOMContentLoaded', () => {
        fetch(`/send-id`)
          .then((reqResponse) => reqResponse.json())
          .then((jsonResponse) => {
            let myLiffId = jsonResponse.id;
            initializeLiff(myLiffId);
          })
          .catch((err) => {
            alert(`error: ${JSON.stringify(err)}`);
          });
      });
    </script>
  </body>
</html>
It is worth mentioning that liff.init() and some other liff methods return Promise as results, so you should handle those asynchronous code carefully.
Sending Messages from LIFF page
After initializing the LIFF page, we can call liff.sendMessages to send messages in the thread imperatively. For example:
liff.sendMessages([
  {
    type: 'text',
    text: 'Hello, LIFF!',
  },
]);
Up to five texts, images, videos, audios, locations, templates (only a URI action can be set as an action), and flex messages are acceptable.
Let's add a click event listener to send messages on click. You could replace the body tag in liff.html with the following implementation:
<body>
  <button id="button">send test message</button>
  <script src="https://static.line-scdn.net/liff/edge/2.1/sdk.js"></script>
  <script>
    function initializeLiff(myLiffId) {
      liff
        .init({
          liffId: myLiffId,
        })
        .then(() => {
          setButtonHandler();
        })
        .catch((err) => {
          alert(`error: ${JSON.stringify(err)}`);
        });
    }

    function setButtonHandler() {
      let button = document.getElementById('button');
      button.addEventListener('click', () => {
        window.alert('clicked: sendMessages');
        liff
          .sendMessages([
            {
              type: 'text',
              text: 'Hello, LIFF!',
            },
          ])
          .then(() => {
            alert('message sent');
            liff.closeWindow();
          })
          .catch((err) => {
            window.alert('Error sending message: ' + err);
          });
      });
    }

    document.addEventListener('DOMContentLoaded', () => {
      fetch(`/send-id`)
        .then((reqResponse) => reqResponse.json())
        .then((jsonResponse) => {
          let myLiffId = jsonResponse.id;
          initializeLiff(myLiffId);
        })
        .catch((err) => {
          alert(`error: ${JSON.stringify(err)}`);
        });
    });
  </script>
</body>
Sending LIFF LINK to the User
To test the LIFF page, you could replace the code in index.js to send the LIFF URL to the user:
module.exports = async function App(context) {
  const liffUrl = `https://liff.line.me/${process.env.LINE_LIFF_ID}`;
  await context.sendText(liffUrl);
};
Now, you could execute yarn dev or npm run dev to start the server, and you have a LINE Bot with a simple LIFF page.